I love this easy and quick Valentine craft. You can find the step-by-step tutorial below plus a blanket stitch how to. I love quilts…old quilts, new quilts, quilt tops, quilt pieces…all quilts. So cutting one up is really difficult for me. When I realized that this lovely old quilt was just being hidden away in a closet I decided that it could be repurposed, taken out of the closet, and put out so I could see it every day…I got over my fear and sadness of cutting someone’s handwork apart.

a batch of hearts on the quilt
Repurpose Old to New
This lovely old quilt is tattered and torn. There are holes. The stuffing has fallen away and what is left is hardened and knotted…so it is beyond saving or repairing.

close up of the quilt hearts
In deference to the raggedy appearance and the construction of the quilt, I made my stitches random and childlike. The embroidery stitch I used is blanket stitch. Blanket stitch works very well around curves! I wanted these too look like they were made by me when I was 10 years old. I think I accomplished that look!!!
So let’s get into the tutorial.
A Quick Valentine Craft
You will need
an old, ragged quilt to cut up
old buttons
6 strand embroidery floss in color to coordinate with quilt
sharp needle with large eye
 Instructions
- Lay quilt flat on hard surface and choose a place on the quilt to begin cutting. The first cut is the hardest.
- Cut hearts with sharp scissors. You can do it freeform as I did or use the printable pattern below. Click to enlarge.

- Thread your needle with 2 strands of floss cut as long as you can handle. I used an arm length plus some.
- Chose a button or two that will look good on the heart. Place it on the heart in position and run thread through a button hole and down through the heart and return it back up through another hole. Leave a 3-4 inch tail at the beginning and the end just for fun. Repeat this process several times to anchor the heart. Tie the ends together several times to secure. Cut thread.
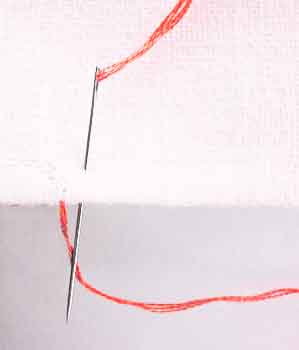
- Run your needle and thread into the back side of the quilt and through the batting coming out on an edge. Leave a tail buried in the batting to secure. Embroider a blanket stitch around the edges of the heart. See the how to on blanket stitch below.
Blanket Stitch How To
I demonstrate the stitch on a flat piece of fabric first. It is easier to learn that way. The last photo shows wrapping edges with blanket stitch. You might want to look at the pictures because this is quite hard to explain in words!!! 🙂
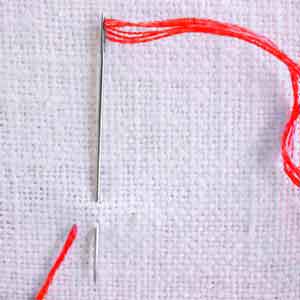
- Pull floss through front side of the fabric.
- Move needle to the back side of the heart and poke through about 1/4″. Repeat that again from the back side to front. Come down so the stitch is aligned along the bottom.
- Before you pull the floss tight, run the needle back through the loop of the floss making sure your needle loops under the thread, pull it through until it lies firmly against the emerging thread. You’ll see that each new stitch secures and holds the loop of the previous stitch.
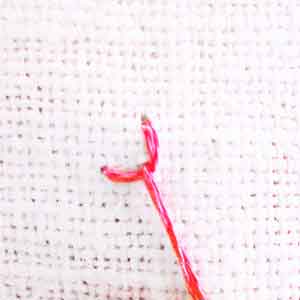
- Then pull taught, not tight. It will create a L shape. The first one always looks a bit odd, but the rest will be okay.
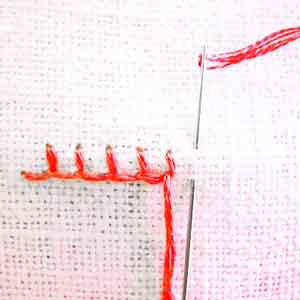
- Repeat step 2 through 4 around the heart.
blanket stitch over edge of fabric
- When you come to the end, take your thread to the back over the last loop to secure it. Bring your needle back through the fold to hide the ending and run it back through the batting an inch or so and cut.
Look around pick up yesterday’s FREEBIE Melted Snowman Soup. If you like what you see, please follow me and I will follow back!! Introduce yourself please…Enjoy!!! Please help me spread the word about Cre8tive Compass…I am working overtime to provide great content for artists…it would be a gift to me if you tell your friends about us!!! Have a blessed holiday and New Year.


Wonderful project… I didn’t get filled with the creativity gene! Thanks for visiting me! I’m your newest follower! ~ Ellen
I cherish the old quilts my grandparents made for me and my children when they were babies. After my parents passed away I inherited 2 family quilts that are well over 200 years old each. I chose these because out of the 4 antique quilts divided among us “children”, I am the crafty one when it comes to needlework and thought I could someday,somehow salvage these now rattty,old quilts. Your heart ornament idea is wonderful,especially since my siblings and I do an ornament exchange each Christmas. I have collected a lot of vintage buttons over the years that can be used in this project,too! Thank you for giving me the courage to cut apart these lovingly made quilts,add my own creative touches to them, and let them continue to be wonderful,family momentos of days gone by and inspirations for the memories yet to be made in our lives.