Wow oh Wow…I love these gilded pumpkins…this has to be one of the greatest autumnal decorating ideas ever! Okay, I am a little carried away, but decorators, DIYers, creatives and decorative painters the world over should be putting together a display for their living spaces. It is really quite simple to gild (apply gold leaf) a pumpkin. However, you might just want to spray paint them if glue and gold leaf are a little out of your realm of possibilities!!!
 A front entrance speaks of sophistication and fun when a few gilded pumpkins are placed strategically. But don’t stop with the pumpkins…you can gild plant pots, faux fruit and veggies, benches and much more. Just use your imagination and let me know what you gild by leaving a comment and a link below!!!
 In the fall of 2008, Country Living magazine featured these beautiful photos and article by my friend Carol Kemery, decorative painter, nurse and owner of Caromal Colours…a paint company that allows homeowners to do decorative painting on their own, including the GILDING project featured here.

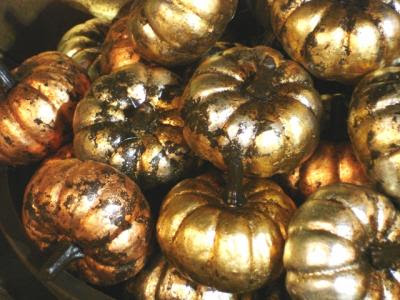 TECHNIQUE HOW-TO ~ Polk Dot Pumpkin:

Step 1
For real or faux pumpkins, be sure surface is clean and dry. Wearing gloves, apply base coat of paint (color of your choice) with a paintbrush to seal the surface. Let dry for 30 to 60 minutes.
Step 2
Position stickers on pumpkin, then apply “the sticky size” over entire surface, including stickers. Leave alone until it’s clear and tacky, 10 to 20 minutes.
Step 3
Apply gold and silver leaf. Broken pieces of metal leaf, called Schaibin, lie easily on the pumpkin for a beautiful finish. With a soft cloth, smooth leaf onto surface to fill in gaps. Keep excess leaf for the next project.
Step 4
Carefully pull off stickers using tweezers.
Step 5
Apply the toner color with a paintbrush. Using a soft cloth, wipe away the toner to achieve the desired color. Leave the toner darker around the stem or in crevices for a more dramatic effect.
 for step-by-step pictures visit Country Living


Gorgeous!! I want some for my porch 🙂
Sooooo pretty!! Love these! Just pinned it! 🙂
I love them…so pretty and perfect for fall.
How cute! Want to make some for me?
So gorgeous!!!!!!!!!!!!!!!!!
BE-A-U-TI-FUL!
Beautiful! I am SOOO not a decorator! I think you need to give lessons!
You never cease to amaze me with how easy you make being creative seem! I love the elegant look of these pumpkins!
Elle: I would love to make some with you!!! XOXOX
I amaze myself sometime XOXOX
come make some with me!! XOXOX
thank you
they are amazing to look at!!! XOXOX
thank you Courtney XOXOX
thanks sparkles XOXOX
i do give lessons :}} XOXOX
that is so very creative I love it.
Those are terrific! A classy yet festive take on Halloween and Fall. Thanks!